


SHARE
Automating proxy deployment with Python
During the execution of an audit, or in other cases such as when
consuming a service, which we want to avoid IP blocking, or in the case of the execution of
a web crawling/spider, we must find a way to change our real IP every certain amount of
requests or time. There are different ways to perform this task within two well marked
categories, the way of using free infrastructure (such as public proxies or tor) and the
other using a private service of a rotating proxy or the use of the well-known Amazon
service.
In this case we are going to see in detail how to take advantage of public proxy lists, but
we are also going to mention the other points mentioned above.
We will develop a Python code that will facilitate the automation of:
• Extraction and digesting of public proxy lists
• Development of code to filter proxies based on latency and other
criteria.
• Automatic checking of each proxy
• Automatic configuration of a load balancer with verified proxy list
• Generation of proxychains configuration file (alternative)
Source and digest of information
Before starting with the development of the first draft of the code, we need to find a
source of information for our purpose. It should be noted that if we make this stage as
simplified as possible, we will be able to add new sources more easily and extend the life
of the code and the developer's patience.
After a simple Google search, we found an interesting service because of the open way of
sharing the list of proxies (download in json, txt, csv, etc. format). This is in our favor,
since we will be saving time by not having to parse HTML.
The service we will use will be Genode (https://geonode.com/free-proxy-list/)
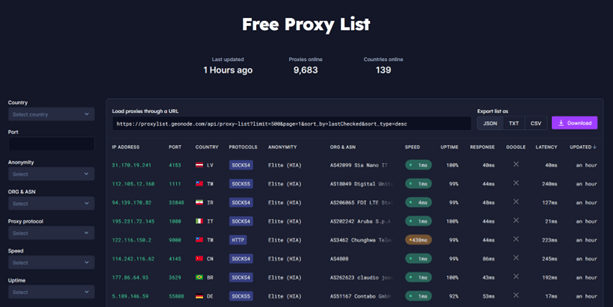
Let's analyze how we get this information if we get it with curl and process it with jq, but
first let's modify a little the URL, since the link that provides us the page, will bring
500 proxies, let's bring only one to examine the response and the data structure
received:

The answer is as follows:
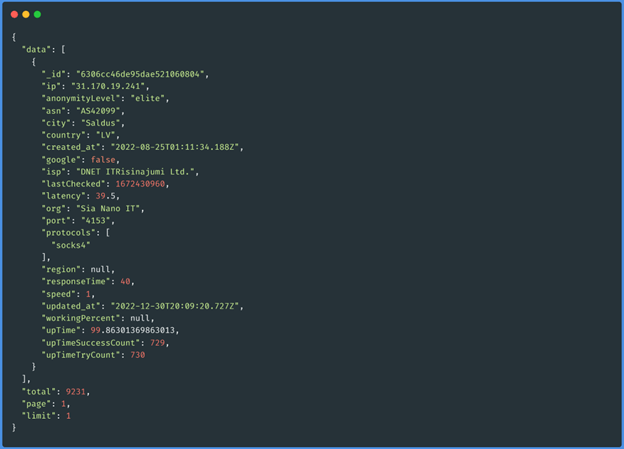
We can use all this information in the most creative ways, for this case we will only use
data["ip"], data["latency"] and total. The total of proxies may not be very important now,
but it will be useful to go through the different pages, keep in mind that the url shows the
results per page, and the maximum number of proxies to bring is 500. The following functions
are simplified as much as possible to understand the flow of information, and unnecessary
strings that make reading difficult have been eliminated:
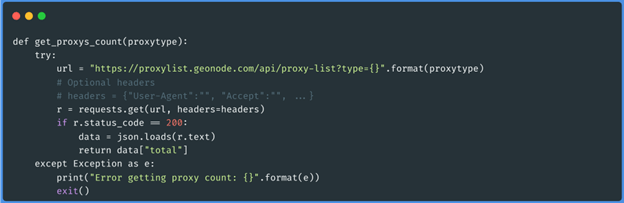
Function get_proxys_count(“socks5”)
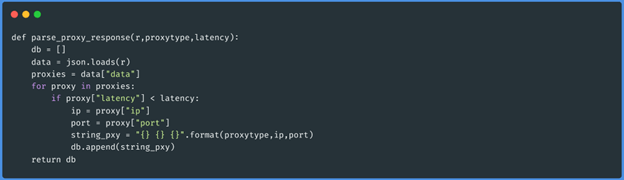
Function parse_proxy_response(json,”socks5”,50)
Function get_proxy_list(“socks5”,50)
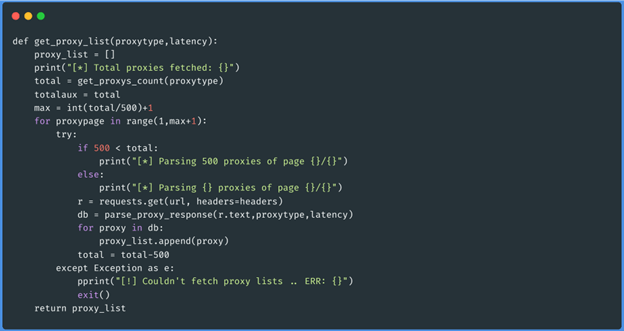
These three functions obtain the json of each page of the proxies of the type that we want
(http, https, socks4 and socks5), then it goes through that data and generates an array with
the proxies that have less latency than 50 (this we pass it by parameter at the moment of
executing the script). The data will be saved as follows:

Testing of proxies
For this stage, the following will be to take as input the result of the previous stage,
where we already have our proxies with the format of the ProxyChains configuration file. One
of the ways to test these proxies, is to make a request to a web page through the protocol,
ip and port that we obtained, and analyze the response. Based on this our script will
identify which proxies we can use from our location, if one runs the script from IP of
different countries, you will get different results, since some proxies are only enabled for
certain zones.
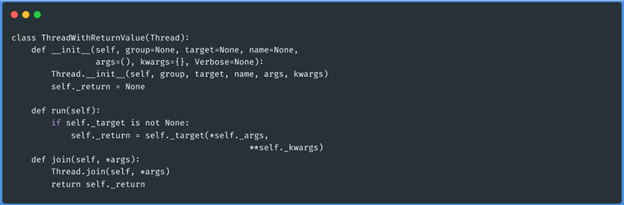
When using the request module if we test for example 2,000 proxies, this will be quite slow
if done one at a time. For this we are going to use multi-threading, with the Python
threading library. Since the test execution needs to return a positive or negative value in
case the proxy is usable, we need to declare a new class, the library in question.
Thread class with return value
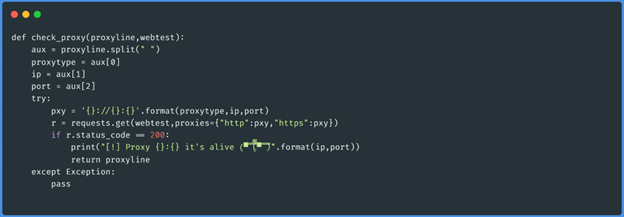
Now we can run the function that will check the proxies and determine based on the returned
value if the proxy is alive or not. The function is as follows:
Function check_proxy(“socks5 1.1.1.1 3128”,”http://ifconfig.me/ip”)
Now we will create the function that will execute 12 workers at a time and check our
filtered list of active proxies.
Function do_multi_thread_check(array_proxies,”http://ifconfig.me/ip”):
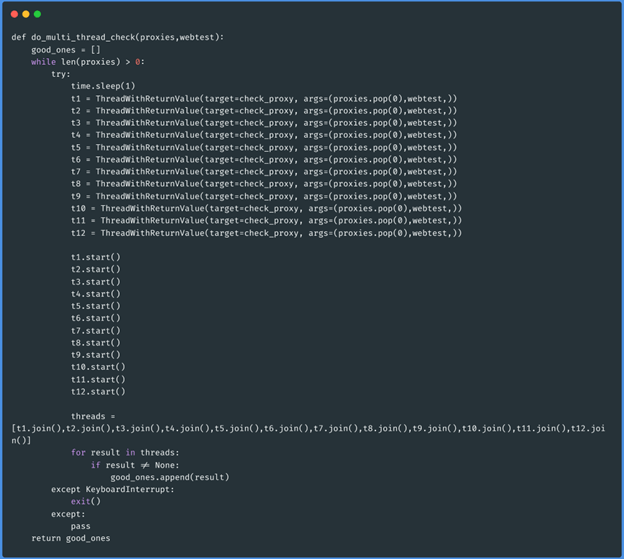
This particular function will receive as parameter the list of proxies filtered by latency
and the web site against which we want to test if they work.
The programming logic of this last function will be that, as long as there are proxies in
the proxies argument, it will create 12 workers, each one extracts a proxy and removes the
extracted value from the original list until the argument is empty. If the proxy is alive,
the worker that verified it returns the information, and this is stored in a new variable
called good_ones. At the end of the task, the function returns these proxies that are
working.
Load balancer
The previous stage left us with a variable with tested and functional proxies. The task now
is to raise a single port with a service that can distribute the load of the traffic we want
to "proxify". A good alternative to perform this task, is the following project which fits
our needs: https://github.com/extremecoders-re/go-dispatch-proxy
This tool is an adaptation of the dispatch-proxy developed in NodeJS and Golang. This last
detail seems interesting, since it is a very fast language. To use the tool, we must install
libpcap-dev:

We can compile the project or download the functional release. In our case, we will compile
the code on our machine:

And that's it! We already have the load balancer binary compiled, if everything went well,
we should get as output in the last command a message like the following:

The next step will be to move the load balancer binary to the folder where we have developed
the Python script, after that, we will develop the following function to lift the compiled
binary with the good proxies we got in the previous step:
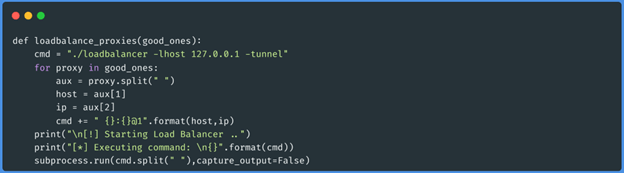
This function will assemble the command according to the repository documentation and
execute it through subprocess.run.
Let's execute the developed code with the following arguments:

The execution of our script produces the following output:
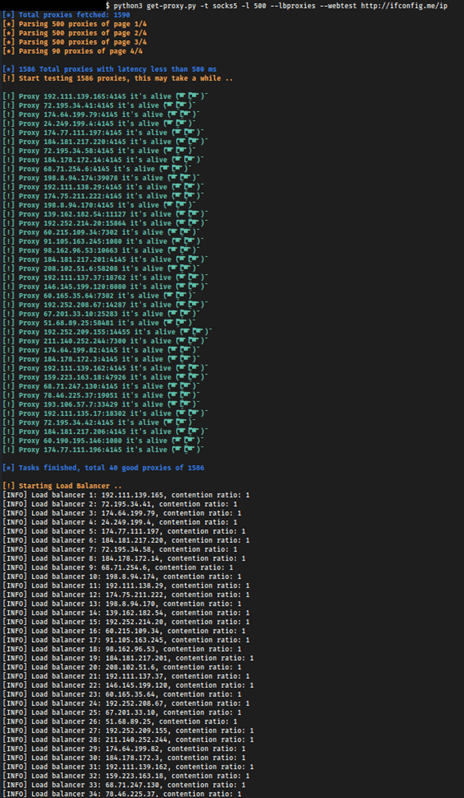
We now have a load balancer running with public proxies, be careful when using these
proxies, they generally log all traffic sent including session cookies, credentials or
sensitive information that can be compromised. By raising the connection through the socks5
protocol, the service can be used to scan ports.
This balancer only works with socks5 proxies, therefore, our code must have the
corresponding validation in order not to raise proxies of another type (and thus lose
valuable time).
To perform a port scan we will need a scanner that has support for socks5 proxy, such as
naabu (https://github.com/projectdiscovery/naabu). We only need to pass to the scanner the
port of the loadbalancer that raises by default in 8080.
Generation of proxychains.conf
Analyzing so far we have parsed the proxy lists, processed them, tested the status of each
one and built a load balancer with the active ones, all in an automated way. We could add
one more functionality to our script in which we generate a proxychains configuration file.
For this the following function will do the job:
Function print_proxy_chains_file(array_of_active_proxies,1):

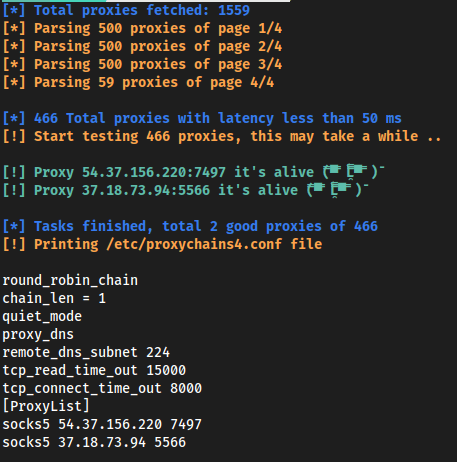
Let's run our script so that instead of raising a load balancer, it prints the proxychains
configuration file, this time we will lower the latency to not test so many proxies and use
the output as a quick example. We will also test from a vps the incoming connections of the
proxies to verify from where they arrive to us:
In localhost:

In the VPS:

The output on localhost, gives the following result:
While on the VPS side we get the following result:

To use the proxies we obtained, we only need to copy the output of the script into the
proxychains.conf file:

Conclusion
In this way we can automate the task of checking a list of proxies and use them with
proxychains or by raising our own load balancer. As we described in the introduction, there
are other ways to perform this task, for example using the rotating-tor-http-proxy docker
project we can raise a HAProxy through the HTTP protocol that has the same functionality as
the code we developed but using multiple instances of tor, which are renewed from time to
time.
In addition, there is another alternative using Amazon's API Gateway services, this method
is very fast when we want to perform web fuzzing and evade IP blocking controls. These last
mentioned methods are not compatible with a port scan, since the protocol used is HTTP and
for this scenario the only possible way is the script developed in this text.
The GitHub repository where all the developed code of the tool is located is below: https://github.com/BASE4-offensive-operations/autolb-proxies